
As a junior lawyer, I was expected to know how to run compares and mark up documents. But I never had a formal training session on it, so naturally made mistakes.
In case it helps, here’s a step-by-step guide setting out (i) the Microsoft Word settings that I find most useful for running compares and marking up documents, (ii) process-related tips to maintain version control and avoid confusion, and (iii) overview of common mistakes and how to avoid them.
1. What is a Compare / Redline?
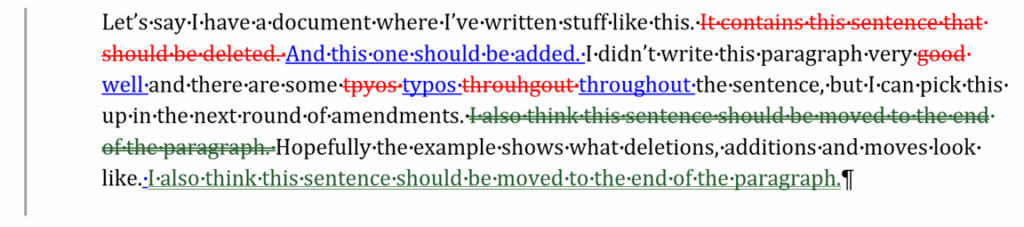
A redline shows the differences between two versions of the same document. It clearly identifies the text that’s been added, deleted or moved.
Redlines are used throughout a transaction or negotiation process, such as:
- When you receive a draft from the other side and need to see what’s changed since your last version;
- When you’ve made edits for your supervisor and want to show them clearly what you’ve changed; and
- When you’re sending a marked-up version to the client to explain your proposed amendments.
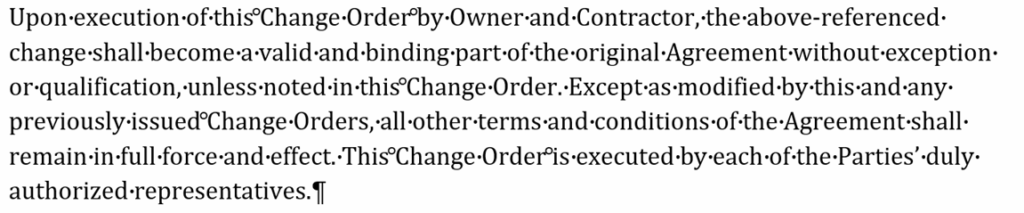
A redline looks something like this:
2. Why Redlining Matters
It’s best practice to issue a redline whenever we amend a document so that we can:
- Track changes across versions so everyone knows exactly what’s been added, deleted, or moved.
- Spot risk shifts, for example, when “reasonable endeavours” becomes “best endeavours,” or a liability cap doubles.
- Communicate clearly – a good redline lets a reviewer understand what’s changed in seconds, without re-reading the whole contract. In longer-term negotiations, parties will often just look at the redlines and not re-read unchanged provisions (unless they are impacted by the new changes).
Reliable redlines are essential to efficient negotiations and contract drafting.
3. How to Run a Compare in Microsoft Word
So how do we run a redline? Most law firms use Word’s Compare function to create redlines. It’s quick, accurate, and works for almost any contract.
Here’s how to do it properly:
Step 1: Open Microsoft Word → Review tab → Compare → Compare two versions of a document (legal blackline).
Step 2: Choose the correct files: Original = earlier version, Revised = newer version.
Step 3: Adjust your settings for clarity (click More >>):
- Tick Ignore formatting to remove clutter.
- Set Show changes at: Word level.
- Choose Show changes in: New document, Revised Document or Original Document
Step 4: Save your comparison file clearly (e.g. Contract v1v2 Compare.docx).
Step 5: Review before sending. Make sure the compare is legible and doesn’t show unnecessary noise.
Here are some other tips I find helpful for running compares:
(a) Create a dedicated Compare folder:
- Keep both old and revised versions used for each compare in the same folder.
- Avoid overwriting master versions elsewhere.
(b) Name your compares clearly e.g. “COMPARE – EPC Contract – Version 2 (2025.10.08) v Version 1 (2025.10.01)”
(c) Save redlines for future reference – you may need them later for finance parties or rechecks.
(d) Keep your workflow clean:
- Use clean documents for compares.
- Delete comment bubbles in the original compare document so that the compare function doesn’t duplicate those comments.
- Label files immediately.
4. Viewing redlines
Microsoft Word offers a few different modes to view redlines. You can access each in the dropdown options in the “Review” tab:
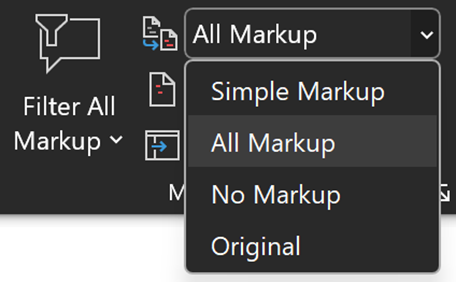
Here’s what each of them look like:
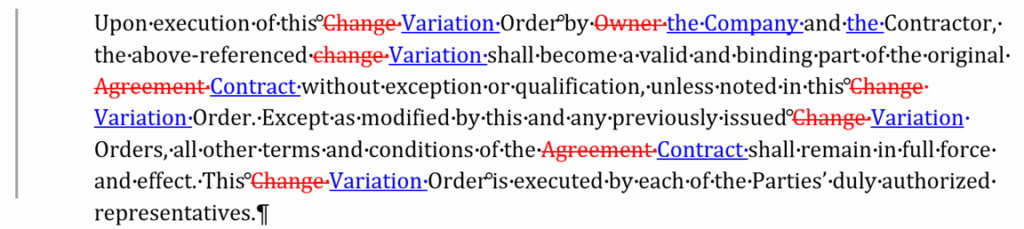
(a) All Markup
This is the default mode that shows all of the redlines / changes as well as the comment bubbles in the document. Useful for seeing all of the changes.
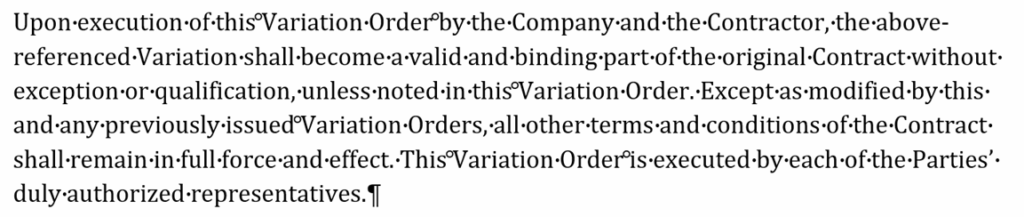
(b) No Markup
This is what the document would look like if all of the changes were accepted. Useful for final reviews.
(c) Simple Markup
This shows the document as if the markup had been accepted (but with a red line next to the text to show that it has been changed). Comments are retained. Useful for quickly reviewing comments.

(d) Original
This shows the document in its original form, without the redlines or comments. Useful to refer back to the original document in its most readable form.
5. How to Mark Up a Contract Clearly
Redlines / compares are good at showing the changes in the final amended product. But I (and most transactional lawyers) find it helpful to make our changes in mark up as we’re working through a document so that we have a just-in-time record of the changes that we’re making.
To turn on this setting in Microsoft Word, click “Review” -> “Tracking” -> “Track Changes”.
Here are some other settings that I use:
- The shortcut to toggle track changes on/off is “Ctrl+Shift+E”. This is helpful if some of the changes you’re making don’t need to be shown in mark up (e.g. formatting).
- Tracked changes should be inline (instead of “in balloon-mode”, i.e. shown in the margins). If your default is “balloon mode”, you can change it to inline by “Review” -> “Show Markup” -> “Show all revisions inline”.
- The best practice for showing mark up is: additions = blue / underline, deletions = red / strikeout, and moved text = green. If these aren’t your default settings (e.g. all of your additions and deletions are shown in the same colour), you can change it in “Track Changes Option” (use the searchbar to get there quickest).
- You can toggle between seeing markup and seeing clean by “Review” -> “All Markup” can be changed to “Simple Markup” or “No Markup”. This can be helpful for confirming that your marked up changes would present properly if accepted (e.g. formatting).
Minimise markup where possible:
- Don’t rewrite whole clauses if only a few words change.
- Keep shared language intact; it keeps the redline readable.
Clearly identify your inputs:
- Use comment bubbles to accompany mark up to explain the changes to your supervisor, the client or the other party. Tag comments with your initials (e.g. JF Note) or your law firm / client’s organization (e.g. “HSFK Note”) and the date (e.g. JF Note 08.10.25 – Confirm if 30 or 60 days’ notice).
- If multiple teams are reviewing, you can also use highlighting to identify where they may be asked to input (e.g. “JF Note 08.10.25: Technical team to confirm that the cross references to the specifications are correct).
- Cross-reference related provisions to help with reviews (e.g. “See also changes to Clause 10.2 in relation to the timing of payments).
Review before sending:
- Proofread, check that the mark ups are accurate, no broken cross references, and that the formatting works (review in ‘no markup’ view).
6. Common Mistakes (and How to Avoid Them)
Even experienced lawyers can slip up when managing redlines with time pressures. Here are the most common mistakes I’ve seen (and made), and how to avoid them.
- Comparing the wrong versions → Mark the ‘original’ and ‘revised’ documents clearly. Double-check file names and timestamps.
- Doubled up comment bubbles → Delete comment bubbles in the ‘original’ document before running the compare.
- Showing too many formatting changes → Tick ‘ignore formatting’ in the compares options before running the compare.
- Over-marking → Only change what’s necessary. Limit your compare settings if needed.
- Inconsistent colours → Set your defaults.
- Leaving metadata → Inspect and remove hidden data before sending.
- Sending the wrong view → Confirm you’re in “All Markup” view before sending.
- Broken cross references → Select all + F9 to update cross references. Then search “Error!”, “Clause 0” and “Clause 1” to spot broken automatic cross referencing.
- Not reading the clean version → Always review in No Markup view at least once.
7. Our sponsor for this guide
This guide is sponsored by ClauseBase – a complete toolbox that helps lawyers face the challenges of drafting and reviewing legal documents. From extracting clauses from your drafting history to AI-powered reviewing, proofreading, analysis, and document clean-up – ClauseBase helps you draft, refine, and review documents without ever leaving Microsoft Word.
To support these free guides and improve your team’s contract drafting capabilities – check out their website or book a demo today